LEARN: Difference between revisions
| Line 126: | Line 126: | ||
Certain components (like quizzes, modules and other content) can be copied from one term course to another for re-use. This feature is also helpful when building a course in a template course well in advance of term, and then just copying to the term course just prior to launch. | Certain components (like quizzes, modules and other content) can be copied from one term course to another for re-use. This feature is also helpful when building a course in a template course well in advance of term, and then just copying to the term course just prior to launch. | ||
[https://uwaterloo. | [https://uwaterloo.atlassian.net/wiki/spaces/ISTKB/pages/864452609/LEARN+frequently+asked+questions#How-do-I-transfer-course-content-from-one-term-to-another%3F Transferring content] | ||
See also: | See also: | ||
Revision as of 12:11, 12 July 2021
LEARN is the University's learning management system (LMS). It is powered by D2L, also called BrightSpace.
Gradebook items
The LEARN Gradebook contains grade information for each student.
Editing gradebook items
Importing Grades from an Excel File
Changing the visibility of gradebook items
Arranging exemptions for individuals
To arrange for an exemption for a given student in a given assessment, see Exempting a Grade Item for a Student.
If you wish to exempt a student from multiple assessments at once, select Enter Grades under any grade item. The select the down arrow next to the individual student and select Bulk Edit Exemptions. Select the various assessments (or all of them) and hit Save.
This is useful to perform on Test Students to ensure the Test Students grades do not affect the class averages.
Editing grades for individuals
To edit multiple grades for a specific item:
- Click Grades in the navbar.
- Click Manage Grades, find the item you want to edit and click the down arrow to the right of the item's name and select Enter Grades.
- Edit Grade and click Save and Close.
To edit individuals' grades:
- Click Grades in the navbar.
- Click Enter Grades, click the users' names you want to edit.
- Edit and click Save and Close.
To adjust final grades for individual students, click here.
Calculating final grades
Calculated grade items and tracking student progress
In order to identify students who are struggling, instructors need to know the grade for each student based only on the components completed in the course. Looking at the final grade statistics shows grade based on all components. So, if only 15% of the graded components are complete, a student with a perfect score would show a final grade of 15%. This makes is hard to identify how given students are actually performing.
You can create a new grade item (called something like "grade so far") which is their percentage grade based on completed components. To do this, select "New Item" in the grade book, the select "Calculated Grade". Then select the grade items you wish to count. A student's grade in this category shows their weighted performance on those components. By selecting "Edit" in the grade item, you can add components as the course progresses. Selecting "Statistics" from that grade item shows both the class and individual student performance.
Uploading final grades to Quest
How Do I Upload My Final Grades
Where to keep student records
Export a Local Copy of Course Grades
Learn data and course stats
Add/drop/withdraw dates
- Click Connect and Classlist in the navbar. The Classlist shows who's enrolled in your course.
- Click Enrolment Statistics.
- Scroll down to the bottom of the page and find the users' names and withdraw dates under Withdrawals.
Class rosters are updated daily at 7:30am, 11:40 am, 4:40 pm, 8:40 pm, 12:40 am.
Last student access
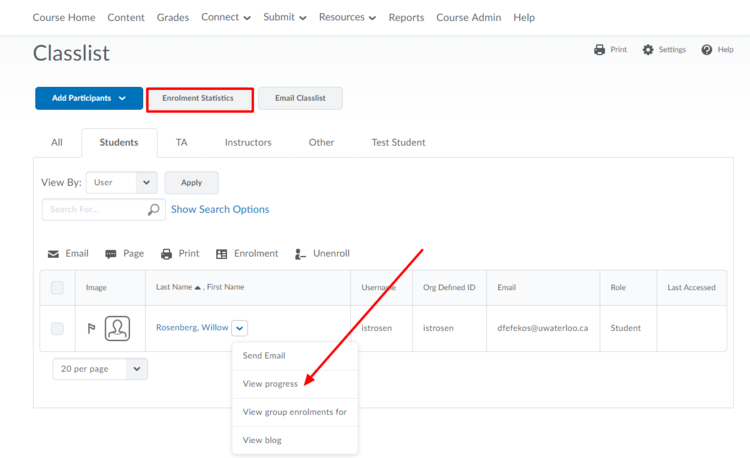
- Click Connect then Classlist in the navbar.
- Find the user whose progress you want check and click the down arrow to the right of the users name and select View Progress (see screenshot).
- Click Course Access and Login History in the left bar to view last student access.
Inactive students
Content views
To view users' completion summary for an item:
- Click Content in the navbar.
- Click an item you want to see and scroll down.
- From Activity Details, Learning Objectives, and Completion Summary at the bottom of the page, choose Completion Summary.
To see your course from a student perspective, Impersonate Test Student.
For more information about monitoring students' online activity, click here.
Additional Functionalities
Connecting with Students
Grades and Submissions
Click Course Admin in the navbar to see more available options.
Posting announcements
Adding an Announcement for a Future Date
Managing Announcements (Edit, Reorder, Dismiss, Delete)
Editing pages
Exporting and Importing Components
Certain components (like quizzes, modules and other content) can be copied from one term course to another for re-use. This feature is also helpful when building a course in a template course well in advance of term, and then just copying to the term course just prior to launch.
See also:
What can be exported from a D2L course
Adding users
Adding instructors
Request a Course to be Created
Please contact learnhelp@uwaterloo.ca and include the userid, full name and role required.
Adding TAs
Adding guest students
Please contact learnhelp@uwaterloo.ca and include the userid, full name and role required.
Adding guest instructors
Adding a Guest Instructor to Your Course
For more information about roles available in LEARN, click here.
BONGO video tools
BONGO is the services built into LEARN for live video sessions (such a tutorials) as well as for students to submit video assignments. There are 4 types of video assignments available:
- Individual Project
- Group Project
- Question and Answer (best option for asynchronous oral exams)
- Interactive Video
Create a video session (like a tutorial or synchronous class session)
In the content area, under "Existing activities" select "Virtual Classroom". Select "Schedule meeting". You will likely want to select the options "publish recorded meeting" (so student who could not attend can view the session later) and "invite entire class". If your class has more than 150 students that you expect to attend, you may need to form groups and only invite students from those groups.
Depending on your technology, you can either share your screen (typically a presentation of some kind, or an app that captures your writing on a screen or tablet) or you can upload a pdf presentation or document directly. The annotation tools can be used to annotate the presentation while in progress. A tip may be to have some blank pages available at the end of the document giving you what is essentially a blank whiteboard on which you can deliver extra content.
Create a Video Assignment
This BONGO webpage outlines the differences between the types of video assignment.
It is likely best to control the due dates and times via the settings in LEARN, as opposed to via the BONGO settings.
To create a video assignment in LEARN, in the Content area, under "Existing Activities" select "Video Assignment". Help with some of the setup options can be found on the BONGO designer page